Saving a cropped high-resolution image
The images displayed by brainmaps.org are extremely large composites
called image hierarchies. They do not exist as a single file, but
rather a collection of many small files at different resolutions. To
present the desired image to the user, some of these small images
are retrieved for contiguous display.
We have provided a tool to enable the user to obtain part of a desired
image formed from an image hierarchy. The user may use this tool to
crop part of an image and to save it to a local disk. The saved image
will be a compressed JPEG suitable for editing, printing, or inclusion
in a publication.
This tool is not intended to retrieve an entire image at its highest
resolution. It has been tested and found satisfactory for retrieving
cropped images of up to 6000x4800 pixels.
Note: Measurements in inches are used several times in this
description. These dimensions are those at which the image will print
if it is printed from an application that pays attention to image size
such as Adobe Photoshop. The actual pixel dimensions of the image are
found by multiplying its dimensions by the DPI.
Changes to this dialog box will reflect its use for retrieving
cropped images.
Background
Screen capture of a displayed image will yield a low resolution image
of approximately 75dpi. To save a higher resolution image, the tool
inspects the desired coordinates and retrieves data from higher
resolution levels of the image hierarchy to fulfill the request.
The tool does not manufacture resolution; the underlying image
hierarchy must contain the necessary data. How much real resolution is
available for a saved image depends on the depth of the image
hierarchy and the position of the currently displayed image in it.
In the following table, the first two columns show the relationship
between the DPI control and the maximum magnification that should be
used to crop an image. The remaining columns show actual values for a
5"x4" crop; because the image compression ratio depends on the nature
of the image content, these values should be used as a guide only.
TABLE 1: Sample values for a 5"x4" crop at various DPIs and
magnifications
| DPI |
Maximum Suggested Magnification |
Dimensions |
Pixels |
Image size(B) |
File size(B) |
| 75 |
100.00% |
375x300 |
112K |
340K |
15K |
| 150 |
50.00% |
750x600 |
450K |
1.4M |
77K |
| 300 |
25.00% |
1500x1200 |
1.8M |
5.4M |
427K |
| 600 |
12.50% |
3000x2400 |
7.2M |
21.6M |
2.2M |
| 1200 |
6.25% |
6000x4800 |
28.8M |
86.4M |
8.4M |
Step-by-Step Guide to Saving High-Resolution Images
The steps to save a cropped image are simple.
- Start the Java annotator for the desired image (by clicking on the
 icon next to image thumbnail) icon next to image thumbnail)
- From the Right-click menu, select "Save printable image"
- Choose the desired image resolution
- Use the file browser to specify the file name
- Draw the selection rectangle on the image
- Save the image and close the annotator
These steps are described in more detail below.
1. Start the annotator for the desired image
From the brainmaps.org home page, select the desired species under
the Datasets heading on the left of the page. Next, click on
the desired series of slides. Then click on the appropriate Java
symbol (the icon to the right of the
desired slide
number) to
start the annotator. Prior to its running, click Trust on the
Verify Certificate dialog. The annotator will then open, and
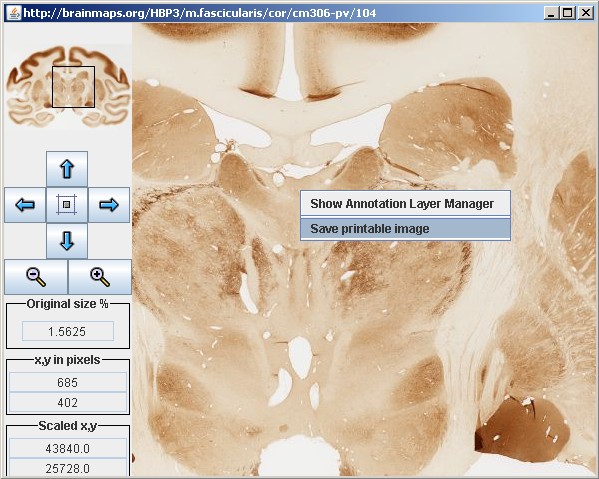
the image may be moved to the desired area and magnification. After
the image is shown as desired, right click on the image and choose
Save printable image. A new dialog looking like the following
will be displayed. Subsequent description will refer to areas on this
dialog.
2. Select "Save printable image" from the Right-click menu
The Right-click menu is shown in the figure below; select "Save printable
image".
3. Choose the desired image resolution
Begin selection by choosing the desired image resolution in dpi from
the pull-down list in the Resolution panel.
The entire Region of Interest panel may be ignored for
this usage.
4. Use the file browser to specify the file name
Use the browse button to bring up a file browser and navigate to the
desired directory in which to save the file. If the file name is not
already present (i.e., creation of a new file is desired), enter the
desired name of the output file into the browser's text box. After
clicking Save in the file browser, the name of the output file
will be shown in the Output file name panel.
5. Draw the selection rectangle on the image
After all the parameters have been set, move the cursor (which has
changed to a cross-hair) to the desired upper-left corner of the
selection and click. A red rectangle will follow the mouse cursor,
indicating the boundary of the selection. The actual dimensions of the
rectangle and the consequent image are displayed in the
Selection size panel while the mouse is being moved. When the
rectangle and dimensions are correct, click the mouse again. This will
enable the Save button, which has been dimmed prior to
this.
6. Save the image and close the annotator
Clicking the Save button will save the image and dismiss the
dialog box. Clicking on the Cancel button instead will dismiss
the dialog without saving anything.
The selected area of the image will be saved as a JPEG file. The image
compression setting used to save the image is generally considered to
produce no visible image degradation while providing good compression.
To close the annotator, simply click on the window manager's close
button.
|